The Caselman air powered machine gun
(Local Cached Copy)
April 7th, 2007 by bobsled
Construction Tips
Drilling the firing valve outlet is done after welding it to the receiver. First place barrel in receiver in proper place. Drill and tap 1/4-28 hole 1/2 inch from front of receiver on the bottom, install allen screw to hold in place. Next mill out loading port and drill vent holes. Roll receiver 90 degrees and put 3/4 round bottom groove 1/16 deep for firing valve body, you also cut 3/4 round through barrel shoulder at same time. Now position and drill 7/32 hole for air inlet in receiver and halfway through barrel at same time. Pull out barrel and in same setting drill on through receiver. Next line up firing valve body and weld in place 3/4 inch welds top and bottom. Be careful not to weld too close to threads. Now firing valve can be drilled through receivers 7/32 holes. Next screw firing valve holding area on tight and locate hole for 1/8 NPT in the end of holding area so that it is down. This hole plums to the tank mount with 90 degree 1/8 NPT to 1/4 brake line fitting.
Making bolt start with 3/4 stock and locate where large dia. is, cut this area down .020 on lathe then build back up with brass over size ( approx. ten-thousandths). Turn down and polish .002 under receiver tube ID. Then finish bolt dimension. Cut 0 ring groove with 1/16 wide cutter with a nose radius of 1/32 go .060 deep.
Trigger housing is made out of rectangular tube with top milled off and cut to dimension. The front mount (part 30) is welded in place, flush with the front, with radius up. The rear mount screws under receiver at 9 3/16 & 9 11/16 with two shouldered 10-32 screws with front mount in place, put in front screw, this will locate 10-32 hole inside of rear mount through #10 hole in trigger housing.
Study trigger and sear assembly before cutting out. Hand fit to your gun the relationship between the hook on the disconnector with the sear, also the auto-sear trip with the bolt. If the disconnector swings down too far before it hits the sear, just as the sear is going to catch the striker assembly, the downward movement of the disconnector will knock the sear down, not catching the striker thus allowing the striker to be slowed down by the bolts function going home. The result, a weak strike on the firing valve. A small wedge of 01 tool steel may be added to sear above where the auto-sear trip sets to make the sear catch point 1/4 inch wide by brazing before hardening. The trigger assembly parts must be polished and allowed to move freely in trigger housing. E-clips may be used as spacers on trigger. The sear and full auto sear trip share center line in the trigger housing. The full auto sear trip sets on the left in the 1/8 inch slot, in the magazine housing.
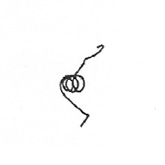
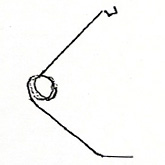
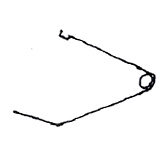
The sear is held in place by a 3/16 dowel pressed in the trigger housing with a 1/4 inch long spacer holding it on its half of center line. A torsion spring wraps around the spacer made of .041 music wire with a 1 3/8 inch leg on the outside with a 90 degree bend 3/8 long, On the floor of the trigger housing. On its third revolution coming up, at approx- 90 degrees it extends 1 5/16 with a U shaped cup 90 degrees away from the coil to hook under the sear.
The disconnector pivots on a dowel pressed in the trigger frame block, after the full-auto sear has slid on center line with the sear. It’s spring torsion that wraps around 1/8 dowel that the disconnector pivots on. It’s made of .026 music wire with a 9/16 leg on the outside with a 90 degree bend 1/8 long leg. It goes in the tiny hole in the trigger frame block. After its third revolution coming up at approx. 90 degrees it extends 7/16 from center of coils with a U shaped hook away from the coils to go into the disconnector.
The trigger pivots on a 1/8 by 1 dowel pin pressed into the trigger housing. Trigger spring torsion wraps around its pivot pin on the left side. It is made of .041 music wire with a 1 inch leg on the outside with a 90 degree bend 3/8 long leg on the floor of the trigger housing. After its 1st revolution it comes around 300 degrees and extends .700 with a U shaped cup, 90 degrees away from coil to hook under thin portion of trigger frame block.
The springs were wound around their pin sizes in a vise, as tight as possible. They were formed with pliers and baked in the oven at 550 degrees to 625 for 35 to 45 minutes.
Compression springs were stretched around a mandrel. The lead screw was set for the pitch, made with closed and ground ends, then baked in oven.
The magazine spring was stretched around an oval bar 1/4 in. by 1/2 in. about 14 in. long at 1/4 pitch wound off by hand, then reset by hand with small pliers and baked. Note; spring will crawl forward in oven.
The magazine was made by milling out a punch and dye with a 3/8 round end mill and a 5/32 radius corner rounding mill. Once formed, spot braze together, and a 5/16 button forced through it with shims to insure proper inside dia. a.400 by 1/8 notches were cut in the sides of the opening for the lugs on the bullet holders to recess in, then braze on bullet holders 1 in. back from end. Allow a little clearance then heat to deep red (not bright), dip in oil then draw back to spring hard. Make catch assembly as shown in magazine follower, put spring in, then follower. This magazine will hold lead alloy bullets while loading and handling. When magazine locks in magazine housing the receiver spreads the bullet holders, letting the bullets flow freely into loading port. The magazine catch is cut into magazine by putting layout blue or black magic marker on magazine sliding it in magazine housing. The magazine release will scratch the blue and show where to cut retaining groove.
Tank selection is important. Be careful in finding or building a tank that it will handle the pressure. You may pressure test a tank with a port-a-power pump to 1000 over pressure required. This would be the safest way. Note part 53 that welds to trigger housing is milled off at an angle, so the tank will clear the receiver approx. a 10 degree angle. Our tank was 3 5/16 in. dia. by 13 3/8 long with 1/2 NPT fitting. If using a different size tank check layout for clearance and adjust angle for fit.
Tuning the weapon is done by adjusting the spring tension on the striker, at the breech block in the rear of the receiver, while maintaining just enough spring tension to force the bolt home. (Shimming the inside bolt spring may be necessary.) Lower pressures may require winding a softer striker spring.
The firing valve stem protrusion distance is critical; if it is too short it will not let out enough air. If it is too long it will cause excessive chamber pressure, which will shock load the magazine spring and collapse it. I suggest .125.
Next up, Pressure & Performance…
Discuss »


